
Don’t settle for that small vanity mirror! If you’re looking to add depth, light, and character to your living spaces, mirror tiles offer an excellent solution. As long as you have a blank wall to work with, this is an easy and versatile project that will convert you into a homebody. Unlike expensive standing mirrors or large, custom-cut pieces, this DIY wall mirror provides a budget-friendly and renter-friendly alternative that allows for greater customization and personal expression. But what exactly would this do for your room? Here’s why you need more mirrors (especially larger ones) in your bedroom, living room, or any space in your home or studio.
- Amplify light – mirrors’ ability to reflect both natural and artificial light is crucial in brightening spaces, making rooms feel more vibrant and welcoming.
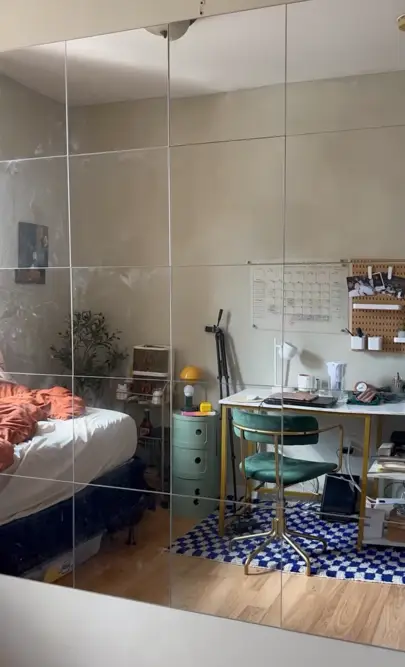
- Create illusion of space – this is particularly important in smaller homes or apartments, as mirrors can make rooms appear significantly larger and more open than they actually are.
- Focal points – large or uniquely designed mirrors can serve as striking centerpieces, adding visual interest and character to a room without the need for expensive artwork.
- Style versatility – the wide variety of mirror styles available makes them adaptable to any interior design theme, from minimalist modern to ornate traditional.
- Functional design – beyond their aesthetic benefits, mirrors serve essential practical purposes in many areas of the home, making them a dual-purpose design element.
This is just 5 out of many reasons. I cannot stress enough how large mirrors can dramatically improve your space, so I guess you just gotta try it yourself!
The beauty in this project (aside form the project itself) is you’ll only need two main materials: 12-inch mirror tiles and double-sided mounting tape. This makes the installation process quick, easy, and accessible to DIYers of all skill levels.
Now that you’re convinced, continue reading below! You can also watch a short Instagram reel of me doing this entire DIY here. A like and follow wouldn’t hurt either.
DIY Wall Mirror: Step by Step Instructions

Materials
- 12-inch mirror tiles (quantity and size depends on your desired coverage)
- Double-sided mounting tape
- Leveling tool (optional)
- Measuring tape
- Pencil

Step-by-Step Installation
1. Begin by selecting a mirror tile. I used 12-inch mirror tiles, but you can use whatever size is appropriate for your project. Clean both the tile and the wall surface to ensure proper adhesion.
2. Apply double-sided mounting tape to the back of the tile. For maximum hold, place strips along all four sides of the tile. Alternatively, you can apply tape to each corner for a more minimal approach.
3. Carefully position the tile on the wall. Use a level to ensure it’s straight, or if you don’t have one, use a measuring tape and pencil to mark guidelines on the wall beforehand.
4. Press firmly on all edges of the tile to secure it in place.
5. Repeat the process with additional tiles, maintaining consistent spacing between each piece.

Tips and Tricks
1. Experiment with different layouts. Try a classic grid pattern, a staggered brick-like arrangement, or even an asymmetrical design for added visual interest.
2. While this guide focuses on 12-inch tiles, don’t be afraid to mix and match sizes for a more dynamic look.
3. Consider creating a “frame” around your mirror tile arrangement using paint or molding to give it some personalization.
4. Strategically place your mirror tiles to reflect natural or artificial light sources, maximizing brightness in the room. However, avoid placing mirrors directly opposite windows that receive strong, direct sunlight as this can pose a fire risk when focused on furniture.
5. If for some reason you need to fit tiles around outlets or in tight spaces, you can carefully score and cut mirror tiles using a glass cutter. Always wear protective gear when attempting this!
6. For a more traditional tiled look, consider leaving small gaps between the mirrors and filling them with caulk or grout. I suggest adding color to your grout for some personality.
Conclusion
By following these steps and incorporating some of these tips, you can create a stunning, personalized wall mirror that enhances your space without breaking the bank. This DIY wall mirror project not only adds visual appeal but also has the practical benefit of making rooms appear larger and brighter than it is. Whether you’re looking to make a statement in your entryway, add depth to a small bathroom, or create an eye-catching accent wall in your living room, mirror tiles offer a flexible and affordable solution that’s sure to impress anyone.
If you end up doing this project, post a photo on Instagram and tag me @lelliestudio.s!
Here are some of the materials mentioned in this post:

Glass Mirror Tiles (multiple sizes and quantity)
$45.99 on Amazon

$8.49 on Amazon

$28.97 on Amazon


$9.98 on Amazon

Acrylic Latex Caulk with Silicone
$2.97 on Amazon

5.5-oz Pre-Mixed Tile Grout Squeeze Tube
$6.93 on Amazon
This site contains product affiliate links. We may receive a commission if you make a purchase after clicking on one of these links at no extra cost to you. Prices listed are subject to change.