
Do you want to create an environment that inspires and energizes you? Are you craving a more functional room that caters to your daily needs? Perhaps you’re feeling overwhelmed by the endless array of decorating options and don’t know where to start. Whether you’re moving into a new space or simply looking to revamp your current one, crafting a room design layout tailored to your needs and personality is worth undertaking!
What Exactly is a Room Layout and Why Do You Need It?
Before we get right into it, let’s start with the basics: What exactly is a room layout, and why does it matter? Well, think of your room layout as the master plan for your living space—a carefully curated arrangement of furniture, decor, and functional elements that come together to create a harmonious environment. But here’s the kicker: A room layout isn’t just about making your space look pretty (although that’s definitely a plus!). It’s also about optimizing functionality and maximizing comfort to suit your unique lifestyle and preferences.
When Should You Create a Room Layout?
Now, you might be wondering, “When is the best time to whip out some tools and start rearranging furniture?” The truth is, there’s never a wrong time to fill your space with a fresh new vibe. Whether you’re planning your room design layout before moving in, getting your hands dirty during the moving process, or sprucing things up after settling in, there’s always a time for a makeover. So, don’t feel like you’re way ahead of yourself or too late. It’s all about getting your dream space!
Crafting Your Dream Space: A Step-by-Step Approach
Now that we’ve set the stage, it’s time to get down to business. Whatever tool you use to design your layout, from online generators to the classic pen and paper, it’s important to follow these steps so you’re not just staring at the screen or paper not knowing how to start. Here’s a friendly breakdown of how to craft your dream room layout as a beginner (but like a pro!):
1. Planning: An Imaginative Process

First things first, you need to remember that you are designing for yourself. Before getting into the nitty gritty of things, we need to take into consideration these essential factors that enhances the user experience:
1. Circulation – think about how you move through your room, especially if you have a tight space. Make sure you prioritize this over furniture placement so that flowing through your room is a breeze. Nothing’s more annoying than moving a piece of furniture out of your way every time you walk to your bed.
2. Outlets – Locating power outlets is often an overlooked step when planning a layout. For example, knowing where your outlets makes it easier for you to decide where to place your desk to work on your computer, place a lamp for studying at night, or plug in your night light within a reasonable distance from your bed.

3. Windows – Do you want to be awaken by the sun’s rays every day? Do you work or study best while looking through a window with a view? Does it matter how much sunlight, or lack of sunlight, you get throughout the day? For some, this doesn’t really matter. But if you’re one who thrives in the sunlight like a glittering Edward Cullen, answering these questions is an effective way to plan a room design layout that caters to you. If you’re moving into a new space, here’s how to determine the amount of sunlight entering your room based on where it’s facing:
- South: Get the most sunlight (and blackout curtains if you love sleeping in!)
- North: Enjoy gentle light, but it’s on the cooler side.
- East: Wake up to morning sunlight, but it’s on the milder side.
- West: Soak up the afternoon rays, but brace yourself for some heat.
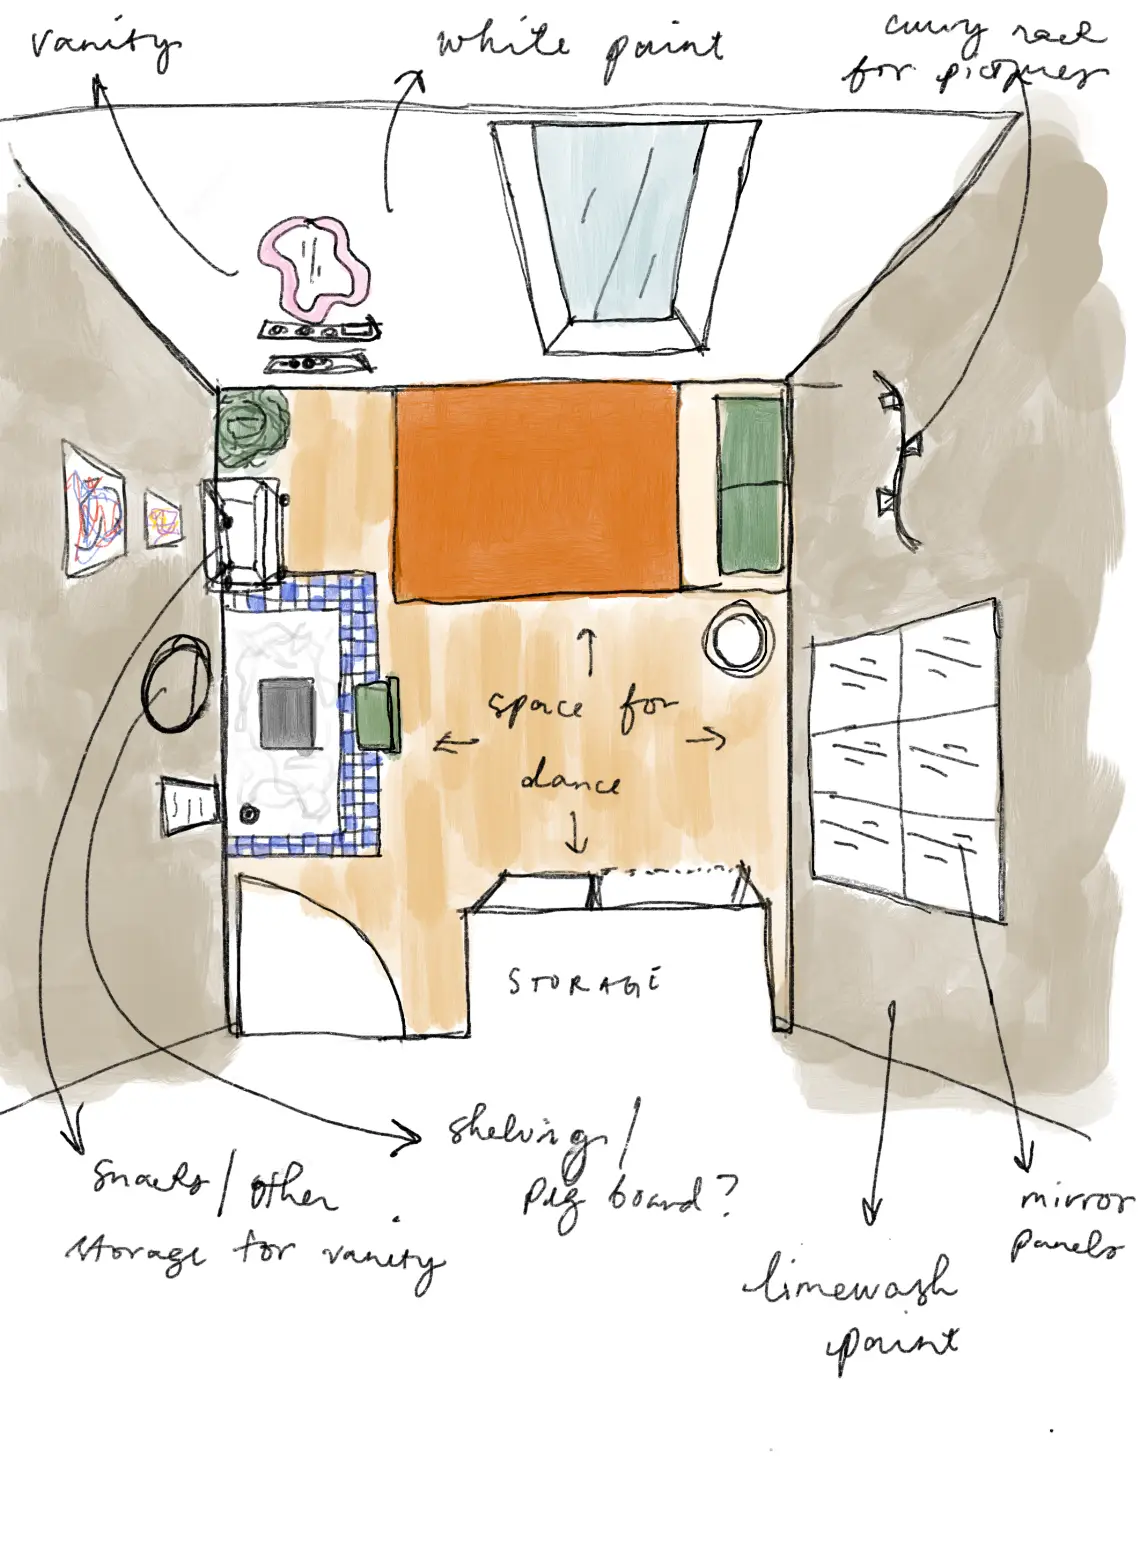
4. Functionality – Think about how you can enhance your space by reflecting on your hobbies, work commitments, and activities, and envision how your room design layout can cater to your unique needs. For example, as a dancer and architecture student, I transformed my 100 square foot room into a multi-functional space by simply positioning my bed and desk against the walls, leaving a good amount of usable space in the middle of my room. Who says you can’t work, play, and rest all in one small room?
2. Measure: Size Matters

It’s crucial to take some measurements first. This is the difference between hauling your furniture around like a champ and disassembling your dresser because it can’t fit through the door. Whip out your tape measure and get to work measuring the dimensions of your room.
measure architectural features such us:
- doors
- windows
measure total square footage:
- wall length – including doors and windows
- wall height – floor to ceiling, not including baseboards and moldings.
- total square footage – wall height multiplied by wall length
Don’t forget to measure potential furniture pieces as well, even if you don’t have it figured out yet, to ensure they fit snugly into your space. Trust me, a little prep work now will save you a ton of headaches later on.
3. Furniture: Sorting Must-Haves from Nice-to-Haves

Now that you’re done measuring and have a good idea of what can fit in your room, it’s time to pair your space with furniture pieces. Again, you don’t have to have it all figured out by now, but a good way to determine what to include in your space is by identifying the key components of your room and organizing them based on priority.
List down must-have items and nice-to-have items:
- must-haves – should serve both functional and aesthetic purposes.
- nice-to-haves – should include the smaller decor pieces that you can fill you room with later on.
Remember, it’s all about finding the perfect balance between style and substance!
4.Tools: Armed and Ready for Design Success

Last but not least, it’s time to arm yourself with the right tools for the job. Whether you prefer online generators, 3D software, or good old-fashioned pen and paper, finding the tools that work best for you . Experiment with different layout configurations, visualize your space in 3D, and let your creativity take over. Here are some online tools and software to help you get started.
Room layout software and generators:
1. Floorplanner: This user-friendly tool allows you to create detailed floor plans and 3D models of your space. It offers a wide range of features and customization options. You can start with the free version, but the advanced pricing is there whenever you need it.
2. RoomSketcher: RoomSketcher offers both a web-based and mobile app platform for creating floor plans and home designs. It’s intuitive and offers a variety of furniture and decor items to customize your layout.
3. Planner 5D: With Planner 5D, you can design both interior and exterior spaces in 2D and 3D views. It offers a vast library of furniture, textures, and materials to bring your design vision to life.
4. HomeByMe: This online tool allows you to create detailed floor plans and 3D renderings of your space. It offers a user-friendly interface and a wide range of customization options.
5. Sweet Home 3D: Sweet Home 3D is an open-source software that lets you create 2D floor plans and 3D models of your space. It’s easy to use and offers a variety of features for designing and decorating your room layout.
6. SketchUp: this is by far the most popular design software. It is a 3D modeling software that allows users to create, edit, and share 3D models of buildings, interiors, landscapes, and more. It’s known for its intuitive interface and ease of use, making it accessible to beginners while still offering advanced features for professional users. You can start with a free trial and upgrade if you wish.
Pen and paper:

This method is my favorite. Using pen and paper to design a room layout can be a fun and effective way to brainstorm, especially if you don’t want to worry too much about measurements in the beginning and just want to visualize your ideas.
Here are some tips to make the most of this traditional approach (refer to sketch image above while going through this outline as reference):
1. Start with a Rough Sketch: Begin by sketching a rough outline of the room, including walls, doors, and windows. I like to use Strathmore 300 Series Sketchpad for my own drawings and my handy PaperMate Sharpwriter Mechanical Pencil, but any pen and paper will do as long as it communicates your visuals how you want it. Keep the sketch loose and free-flowing to allow for easy adjustments as you refine your design.
2. Use a Drawing Software: I personally like to use Procreate on my iPad to sketch my room layout. This is different from the software mentioned above since this still captures the essence of pen and paper sketches. If you tend to make mistakes, this is a perfect alternative for ease of workflow. It also comes with different pen styles and different colors, so no need to buy a bunch of fancy drawing tools.
3. Experiment with Different Layouts: Play around with different furniture arrangements and room configurations. Try multiple iterations to see what works best in terms of flow, functionality, and aesthetics.
4. Label and Annotate: Label each element in your sketch, including furniture pieces, doors, windows, and any other features. Add annotations or notes to indicate specific details or considerations.
5. Consider Scale and Proportion: Pay attention to scale and proportion in your sketches. Use consistent measurements and relative sizing to accurately represent the dimensions of the room and its contents.
6. Use Symbols and Icons: Instead of drawing detailed furniture and decor pieces, use simple symbols or icons to represent different items. For example, use rectangles for beds, circles for tables, and squiggles for plants.
7. Add Texture and Color: Use shading, hatching, or cross-hatching to add texture and color to your sketches. This can help convey different materials and surfaces, such as carpeting, hardwood floors, tile, or paint. In my sketch, I added the color of my tiles and used a bunch of colors for my furniture and decor to see if the color combinations and textures make sense. I also added hatching that resembles nude limewash paint to experiment with wall colors and textures in my previous sketches shown in this article. If you’re using physical paper for your sketches, I recommend Copic Sketch Markers which are popular among designers and come in different sets of colors.
8. Seek Inspiration: Look for inspiration in magazines, books, or online resources. Collect images of room layouts and design elements that appeal to you, and use them as reference points in your sketches. I get most of my inspiration from Pinterest. Create different boards to organize all your pins into different categories of design style. I have a bunch of boards that I already organized that you can look through for inspiration here!
9. Be Open to Feedback: Share your sketches with friends, family, or trusted advisors to get feedback and suggestions. They may offer valuable insights or perspectives that can help improve your design.
10. Iterate and Refine: Don’t be afraid to make changes and revisions as you go. Room design is a creative process, and it’s natural to refine your ideas over time until you achieve the desired result!
By using these tools and techniques, you can bring your dream room to life. Whether you prefer the convenience of online software or the tactile experience of pen and paper, there’s a method that’s perfect for you!
Conclusion
Remember that the journey of design should be enjoyable as the destination. The key is to embrace creativity and let your personality shine through in your space. By following the outlined process—from planning down to the actual designing—you’re well on your way to creating a room design layout that reflects your unique style and meets your practical needs.
Here is a list of the tools I mentioned in this post:


This site contains product affiliate links. We may receive a commission if you make a purchase after clicking on one of these links at no extra cost to you.